User Guide
Welcome to FitEgo! This document will serve as a user guide to the all-in-one scheduling application.
Made with fitness instructors in mind, FitEgo is a desktop program that helps them manage their clients and schedules, optimized for use via a Command Line Interface (CLI) while still having the benefits of a Graphical User Interface (GUI). If you can type fast, FitEgo can get your client management tasks done faster than traditional GUI apps.
Table of Contents
- 1 Quick start
- 2 UI-orientation
- 3 Keyword
- 4 FAQ
- 5 Command Summary
- 6 Acknowledgement
1 Quick start
If this is your first time, here are some quick tips to get started.
-
Ensure you have Java
11or above installed in your Computer. -
Download the latest
FitEgo.jarfrom here. -
Copy the file to the folder you want to use as the home folder for your FitEgo program.
- Double-click the file to start the app. The GUI similar to the figure below should appear in a few seconds. Note how the app contains some sample data.
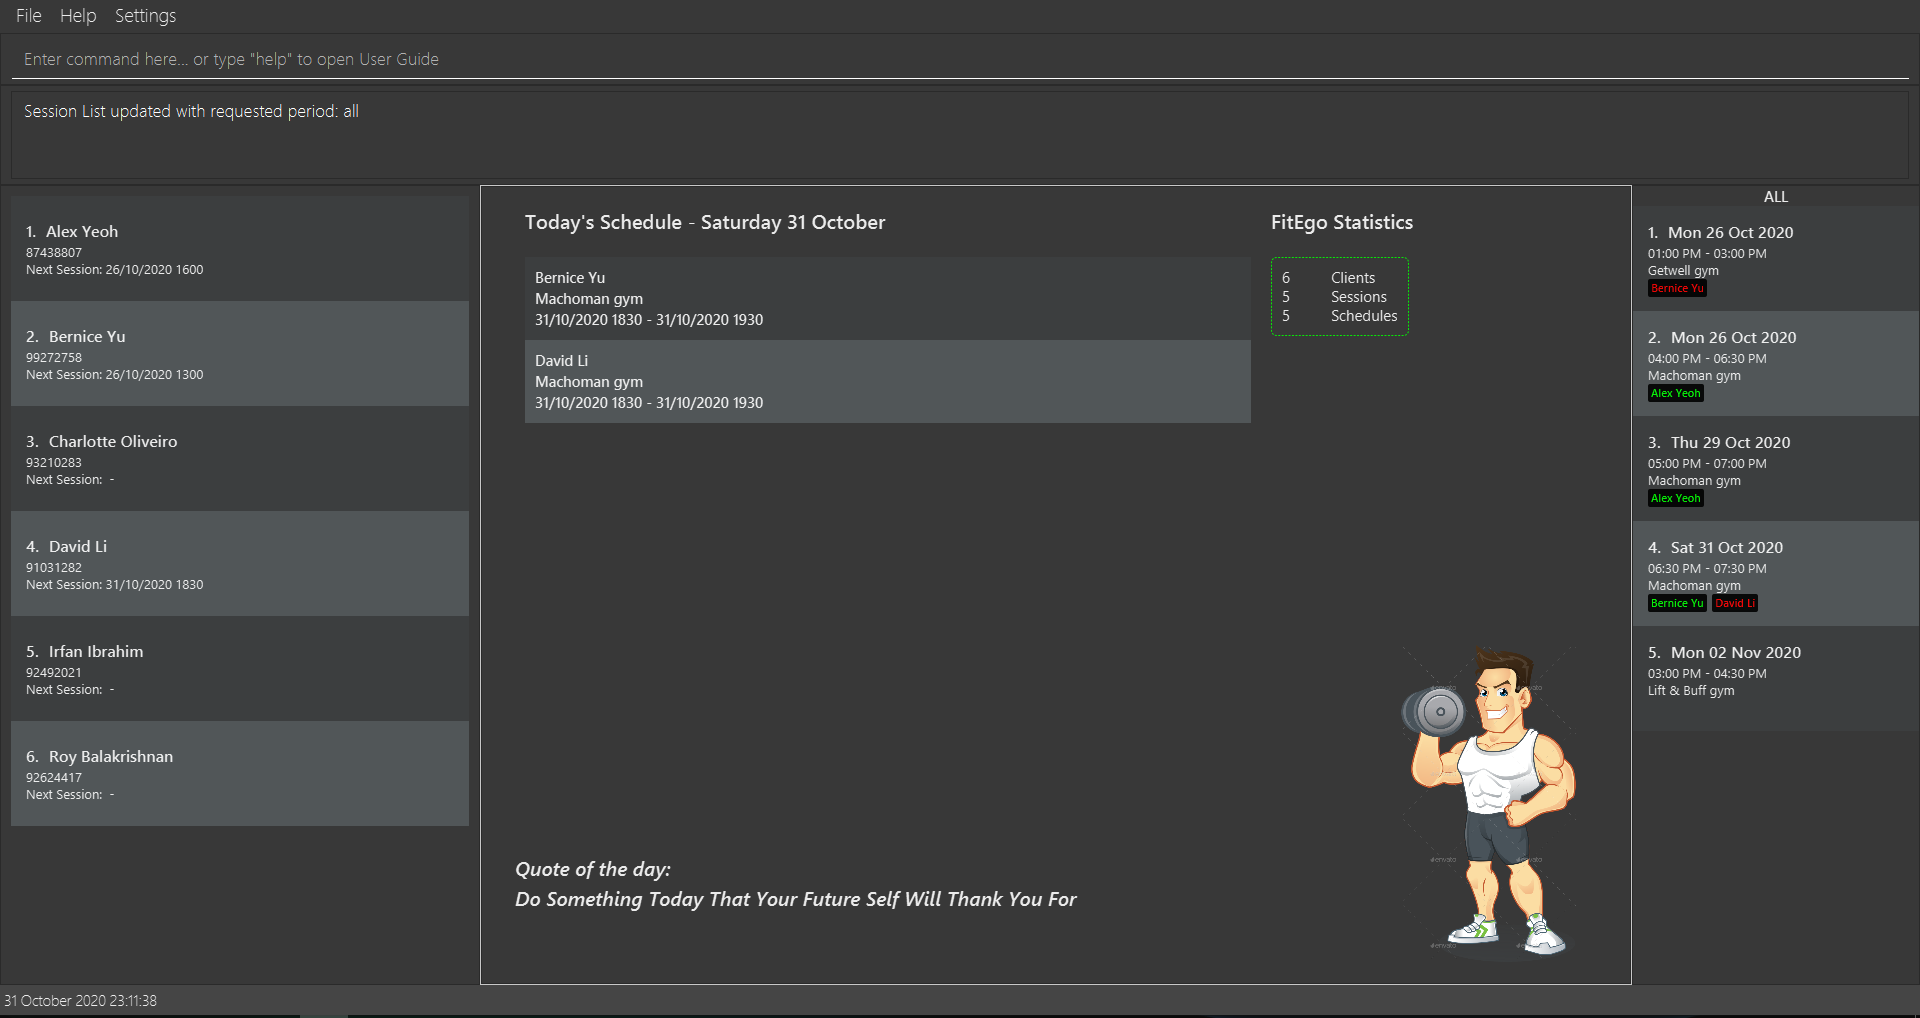
Figure 1 - Sample screenshot of our Ui -
Type the command in the command box and press “Enter” key to execute it. e.g. typing
helpand pressing “Enter” key will open the help window.
Some example commands you can try:-
clist: Lists all clients stored in FitEgo. -
cadd n/Jane Doe p/91234567 e/jane@gmail.com: Adds a client namedJane Doeto the Client List. -
cdel 3: Deletes the third client shown in the Client List. -
exit: Exits the app.
-
-
Read the Overview section for a quick understanding of commands in FitEgo.
- Refer to the Keyword section below for more details of each command.
1.1 How to interpret notations
Below are a few examples of the common notations in this document in which the different backgrounds and icons represent different meanings.
![]() Note:
Note:
Explains the rationale behind our design.
![]() Tip:
Tip:
Good to learn, but not necessary to know to use FitEgo.
![]() Feature:
Feature:
Important to know.
![]() Example:
Example:
An example to follow.
![]() Warning:
Warning:
May have irreversible effect when used. Backup and caution is recommended.
1.2 Overview
You are a fitness instructor.
You record your clients’ details, training progress, payment status and your own timetable across 3 or 4 different applications.
You struggle to keep all of them updated. You struggle even more to get insights out of them.
FitEgo can help you with that. Here’s how:
FitEgo lets you record crucial information that you want to keep track of using three types of entities as shown in the table below.
| Item | Prefix | What it represents |
|---|---|---|
| Client | c | Someone who is interested in or has engaged with your services |
| Session | s | Timeslot for a fitness session |
| Schedule | sch | A client’s booking of a session |
Here’s what you can do:
- When you find a client that is interested in your fitness training services, you can add him/her to your list of clients with the
caddcommand. - Next, create a fitness session on any free timeslot that you have with the
saddcommand. - And, schedule your client to the fitness session with the
schaddcommand.
Simple? That’s the point of FitEgo.
Now, you will probably need to edit, delete and look through your clients and sessions along the way - FitEgo supports all those features and more. Ready to begin? Let’s start exploring!
1.3 General Note
The program will automatically save after every command execution to guarantee that your data will never be lost.
2 UI-orientation
You can refer to the figure below to familiarize yourself with the user interface of FitEgo.
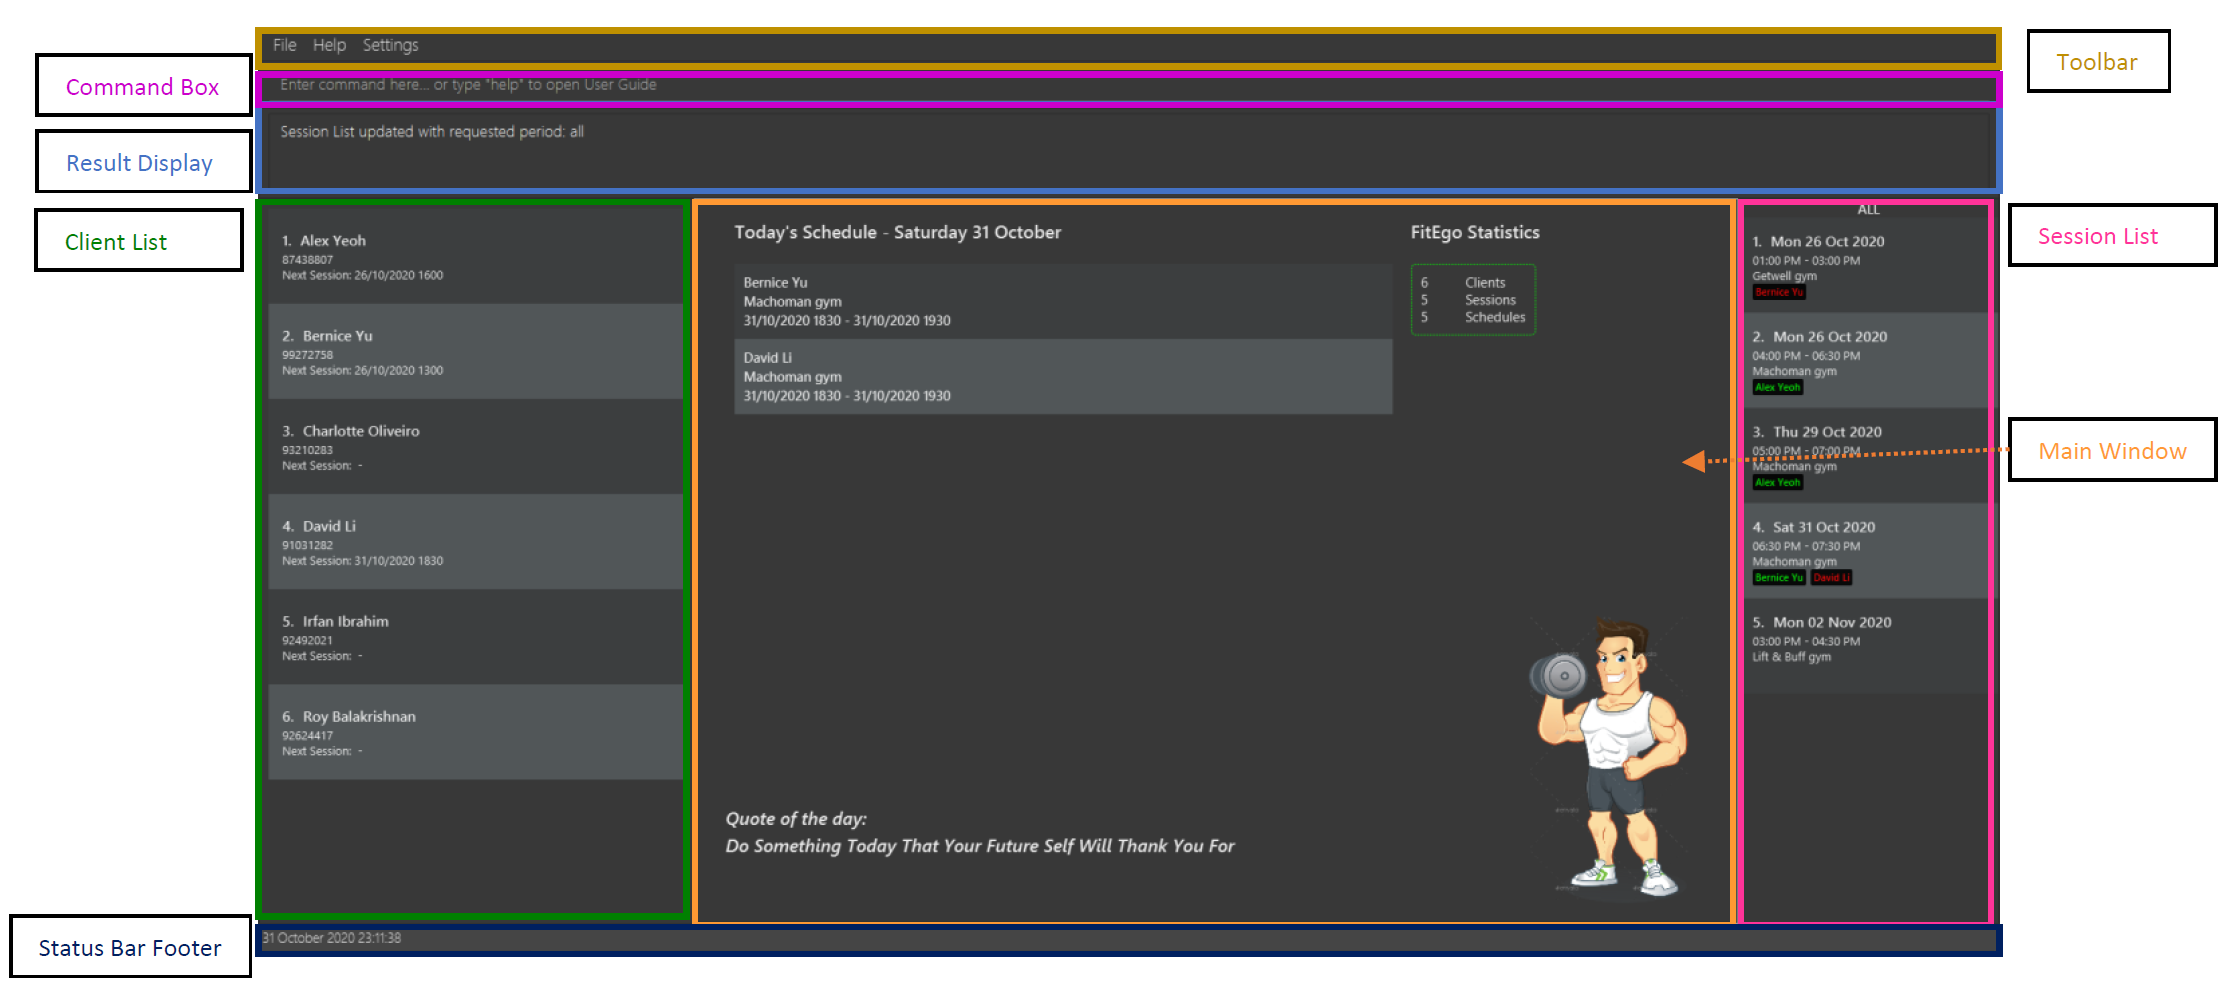
![]() Tip:
Tip:
You can type into the Command Box and it will display the commands that start with your current input.
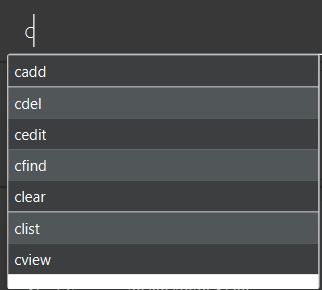
For example, in the above figure, if you enter c and commands that starts with “c” is displayed.
For advanced users, you can use the “TAB” key and FitEgo will auto-complete the first suggestion into the command box, thus increasing your typing speed!
The table below describes the function of each UI component.
| Component | Description |
|---|---|
| Toolbar | Displays the toolbar for this program. You can access the exit and help command from here. |
| Command Box | Displays a text box for your input. You can type your command here. |
| Result Display | Displays the result of your command. If the execution is successful, it will display a success message. Otherwise, it will prompt an error message |
| Client List | Displays the list of clients. You can modify this list using client-related commands |
| Main Window | Displays the main window of this program. It consists of the statistics of this program, today’s schedule and quote of the day |
| Session List | Displays the list of your sessions. You can modify this list using session-related commands |
| Status Bar Footer | Displays the current date and time of the program. If you notice this is incorrect, your PC might be using a different timezone |
3 Keyword
In this section, you can find all the keywords that will help you fully utilize FitEgo.
![]() Notes about the command format:
Notes about the command format:
-
Command keywords are case-sensitive.
-
If a command format specifies an integer as its constraint, it has an upper bound of 2,147,483,647 by default, unless otherwise specified.
-
Items are pairs of prefix and parameter. e.g.
n/NAMEis an item comprising prefixn/and parameterNAME. -
Words in
UPPER_CASEare the parameters that you need to provide. e.g. inadd n/NAME,NAMEis a parameter which can be used asadd n/John Doe. -
Items in square brackets are optional.
e.gn/NAME [t/TAG]can be used asn/John Doe t/injured-thighor asn/John Doe. -
If a command only expects one item but receives multiple items of the same prefix, FitEgo will accept the last item.
-
Items with
… after them can be used multiple times including zero times.
e.g.[t/TAG]…can be used ast/injured-thigh,t/injured-thigh t/allergy-dairyetc. -
Items can be in any order. e.g. if the command specifies
n/NAME p/PHONE_NUMBER,p/PHONE_NUMBER n/NAMEis also acceptable.
This program has separated the keywords into 4 different categories - Main, Client, Session and Schedule.
3.1 Main Keywords
All main keywords are described in this section.
3.1.1 Viewing home : home
You can return to the home page by using this command.
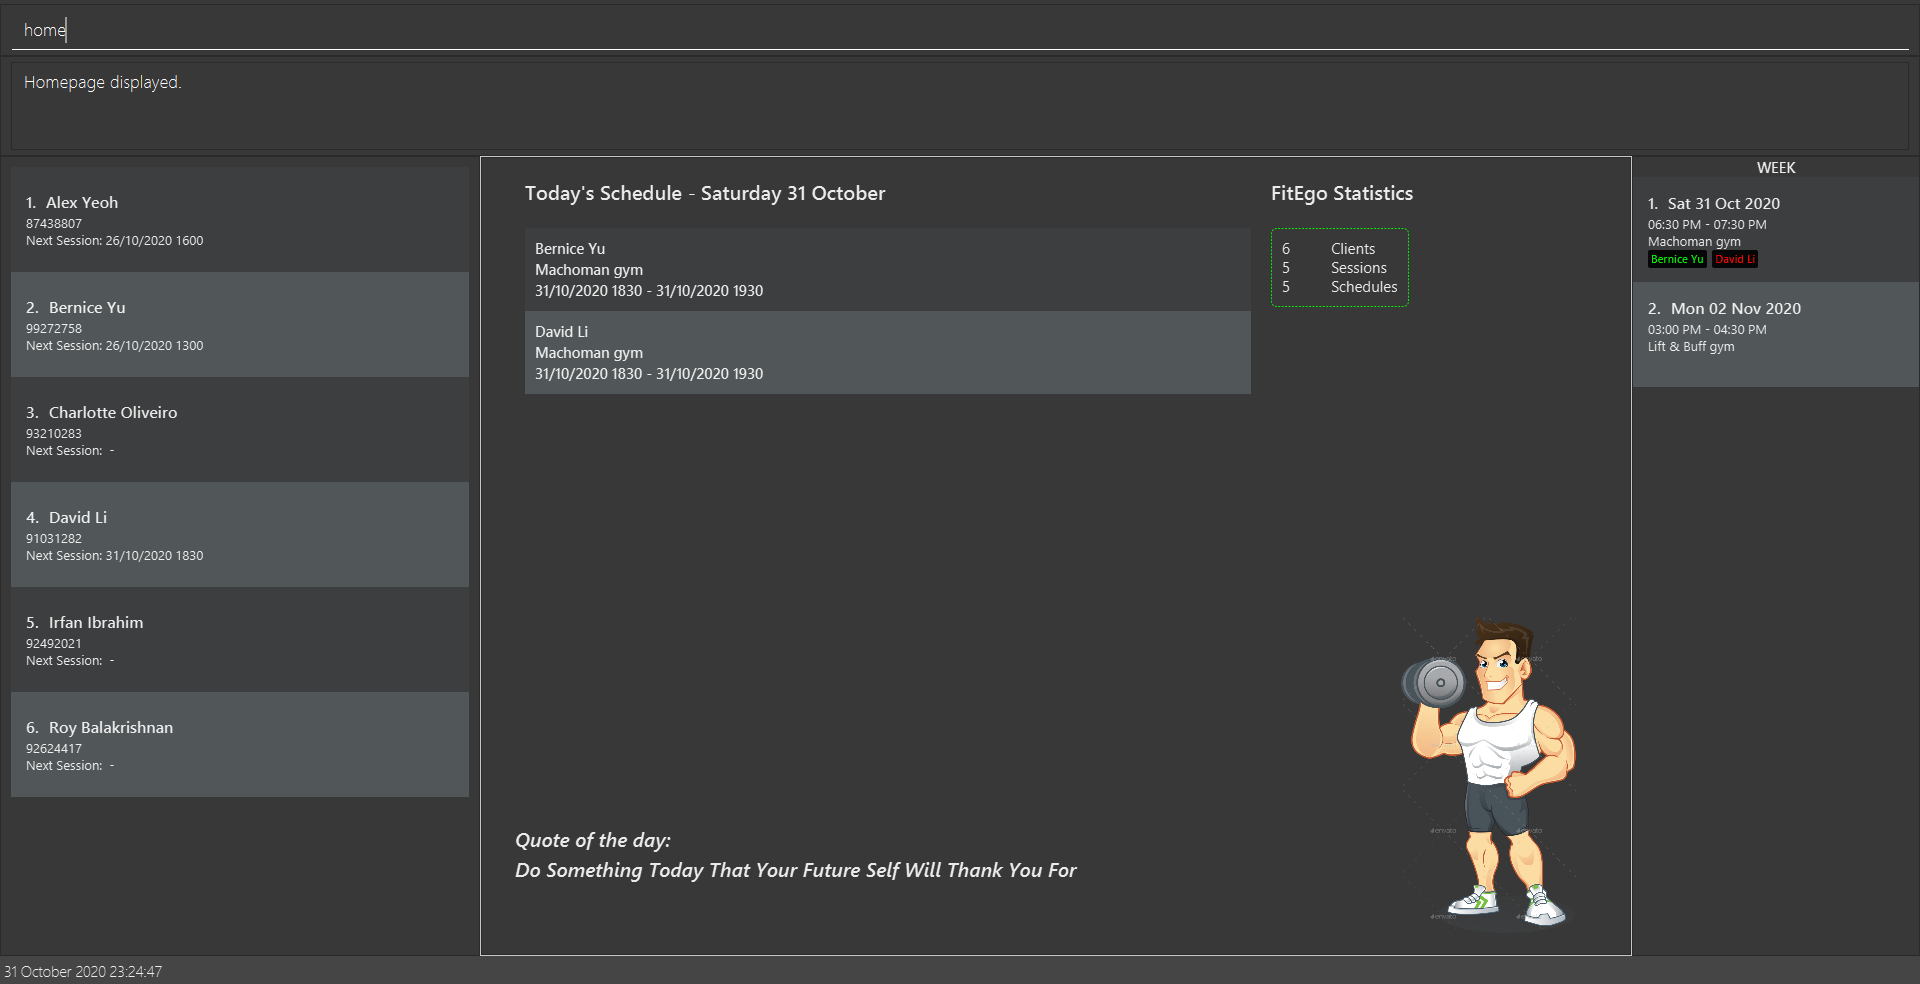
The homepage will display the statistics of your program, today’s schedule and quote of the day as shown in the figure above.
If you do not have any planned schedules for the day, it will display There are no schedules assigned today!.
![]() Feature:
Feature:
If your session spreads over more than 1 day, the schedule will still be displayed if it intersects with today’s date.
3.1.2 Viewing help : help
You can ask FitEgo to open a window with a link to the help page as shown in the figure below.

Format: help
3.1.3 Viewing settings: settings
You can ask FitEgo to open a window to change user settings.
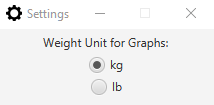
Format: settings
The current settings available are: * preferred weight unit for graphs
*more to come!
3.1.4 Clearing all data in the program : clear
You can delete all data (client, session, schedule) using the clear keyword. All of your existing data will be removed.
3.1.5 Exiting the program : exit
You can exit the program using the exit command. Your data is saved automatically.
Format: exit
3.1.6 Saving the data
Your data in FitEgo are saved in the hard disk automatically after any command that changes the data. There is no need to save manually.
3.2 Client-related Keywords
In this section, we will describe client-related keywords. Before that, let’s define what we mean by client.
![]() Client:
Client:
A client is someone who is interested in or has engaged with your fitness training services.
Each client must have a unique email.
Client-related commands will interact with the Client List which is located on the left of the UI.
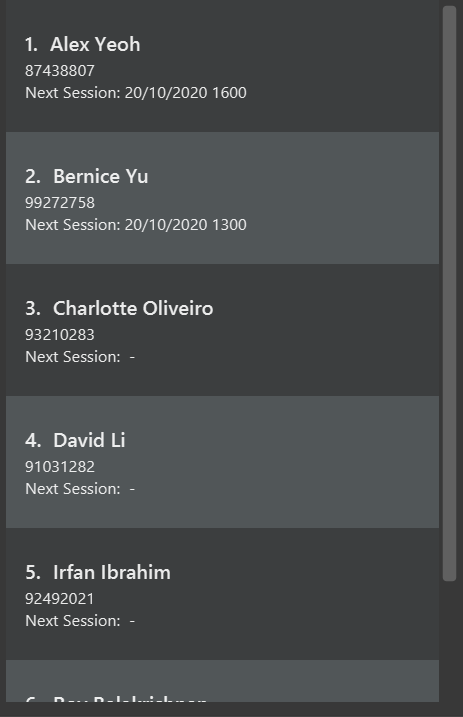
![]() Note:
Note:
The Next Session field below each Client shows you the earliest upcoming session. It is not updated in real-time but after FitEgo executes a command.
3.2.1 Listing all Clients : clist
You can view the list of all clients in FitEgo. The list of clients will be shown at the Client List.
By default, Client List will display all the clients. If you have used cfind or any other commands to filter the Client List,
you can use clist to view the entire list of clients.
Format: clist
3.2.2 Adding a Client : cadd
You can add a client to the Client List including their details. This allows you to easily refer to their information when needed.
Format: cadd n/NAME p/PHONE_NUMBER e/EMAIL a/ADDRESS [t/TAG]
Points to take note when adding a client’s information:
- Email is unique for each client. This means you cannot add a new client if the email specified is already used by another client.
- Each tag is at least 2 characters long and only include alphanumeric characters or hyphen (
-). You are not allowed to start or end a tag with a hyphen.
![]() Feature:
Feature:
You can add a profile picture to your client by storing their photo in a new folder named images within the data folder. You should name the photo
as profile-<client's full name in lowercase and separated by hyphen>.jpg.
For example, if your client’s name is Alex Yeoh,
store his photo as data/images/profile-alex-yeoh.jpg
Examples:
-
cadd n/Jane Doe p/91234567 e/jane@gmail.com a/311, Clementi Ave 2, #02-25adds a client with the specified name, phone number, email and address. -
cadd n/John Doe p/91231367 e/jojo@gmail.com a/311, Clementi Ave 2, #02-25 t/injured-thighadds a client with the specified name, phone number, email, address and tag.
3.2.3 Editing a Client : cedit
If your client has any changes made to his details, then you can edit a client in the Client List. This helps you to reflect the latest information.
Format: cedit INDEX [n/NAME] [p/PHONE] [e/EMAIL] [a/ADDRESS] [t/TAG]
Points to take note when editing a client’s information:
- Edits the client at the specified
INDEX. The index refers to the index number shown in the displayed Client List. The index must be a positive integer 1, 2, 3, … - At least one of the optional fields must be provided.
- You cannot have multiple clients with the same email. This means you will get an error message if the email you specified here is already used by another client.
- Existing values will be updated to the input values.
- When editing tags, the existing tags of the client will be removed, i.e. adding of tags is not cumulative.
- You can remove all of the client’s tags by typing
t/without specifying any tags after it. - After performing a
ceditcommand, you will see the updated client information page.
Examples:
-
cedit 1 t/removes all of the tags of the first client in the Client List -
cedit 2 p/12345678 t/injured-thighedits the phone number and tag of the second client in the Client List. As you can see in the figure below, both fields are updated after executing the command.
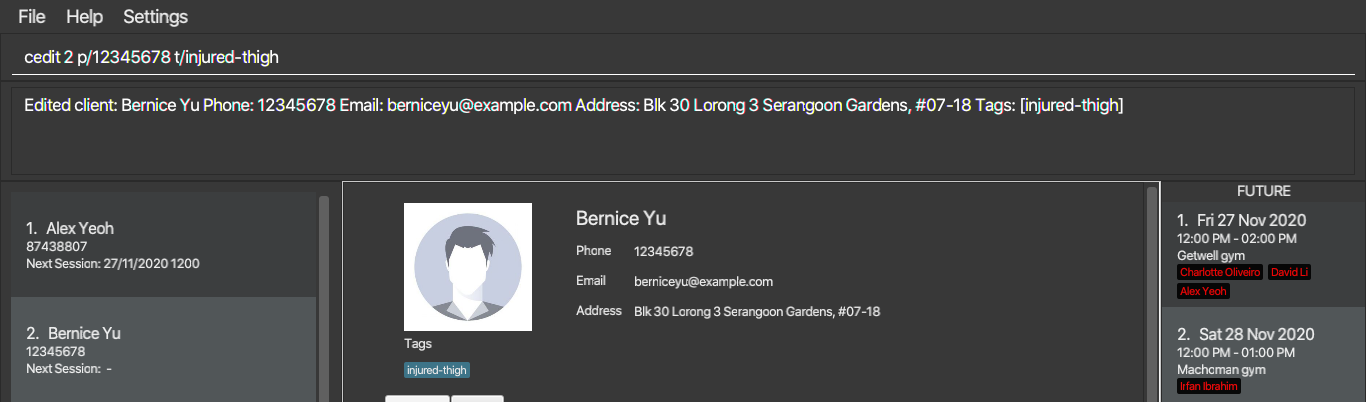
cedit 2 p/12345678 t/injured-thigh3.2.4 Locating Clients by Name : cfind
You can find clients whose name contain any of the given keywords, and see the result in the Client List.
Format: cfind KEYWORD [MORE_KEYWORDS]
Points to take note when finding clients by name:
- The search is case-insensitive, e.g.
hanswill matchHans. - The order of the keywords does not matter, e.g.
Hans Bowill matchBo Hans. - Only the name is searched.
- Partial names will be matched, e.g.
Hanwill matchHans. - Clients matching any substring will be returned (i.e.
ORsearch), e.g.Hans Bowill returnHans Gruber,Bo Yang.
Examples:
-
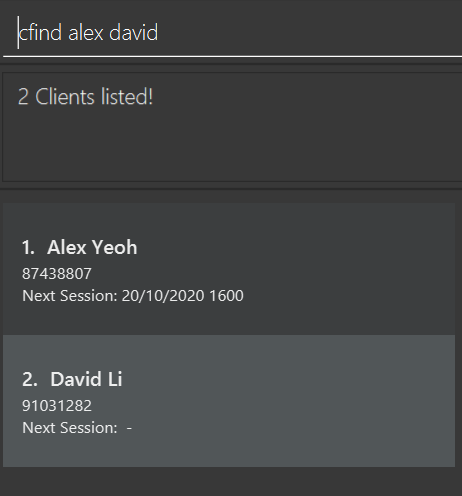
cfind JohnreturnsjohnandJohn Doe -
cfind alex davidreturnsAlex Yeoh,David Lias shown in the figure below
3.2.5 Deleting a Client : cdel
If you are no longer taking up a client, you can delete the client which can be found in the Client List. This helps in reducing obsolete information.
Format: cdel INDEX [f/]
Points to take note when deleting a client from the Client List:
- Deletes the client at the specified
INDEX. - The index refers to the index number shown in the displayed Client List.
- The index must be a positive integer 1, 2, 3, …
Examples:
-
clistfollowed bycdel 2deletes the second client in the resulting Client List -
cfind Bernicefollowed bycdel 1deletes the first client with the name ‘Bernice’ in the resulting Client List- If Bernice is not associated with any schedule, Bernice’s client information is immediately deleted
- If Bernice is associated with one or more schedules, you will see a warning message about the conflict and how to force delete
![]() Feature:
Feature:
-
To force delete a client (and his associated schedules), pass in the optional force flag after the
INDEX. Any string after the force flag (f/) will be ignored. -
If you perform
cdel, you will be returned to the homepage.
- If there are one or more associated schedules associated with Bernice,
cfind Bernicefollowed bycdel 1 f/will: 1. Delete all schedules associated with Bernice 2. Then, delete Bernice’s client information.
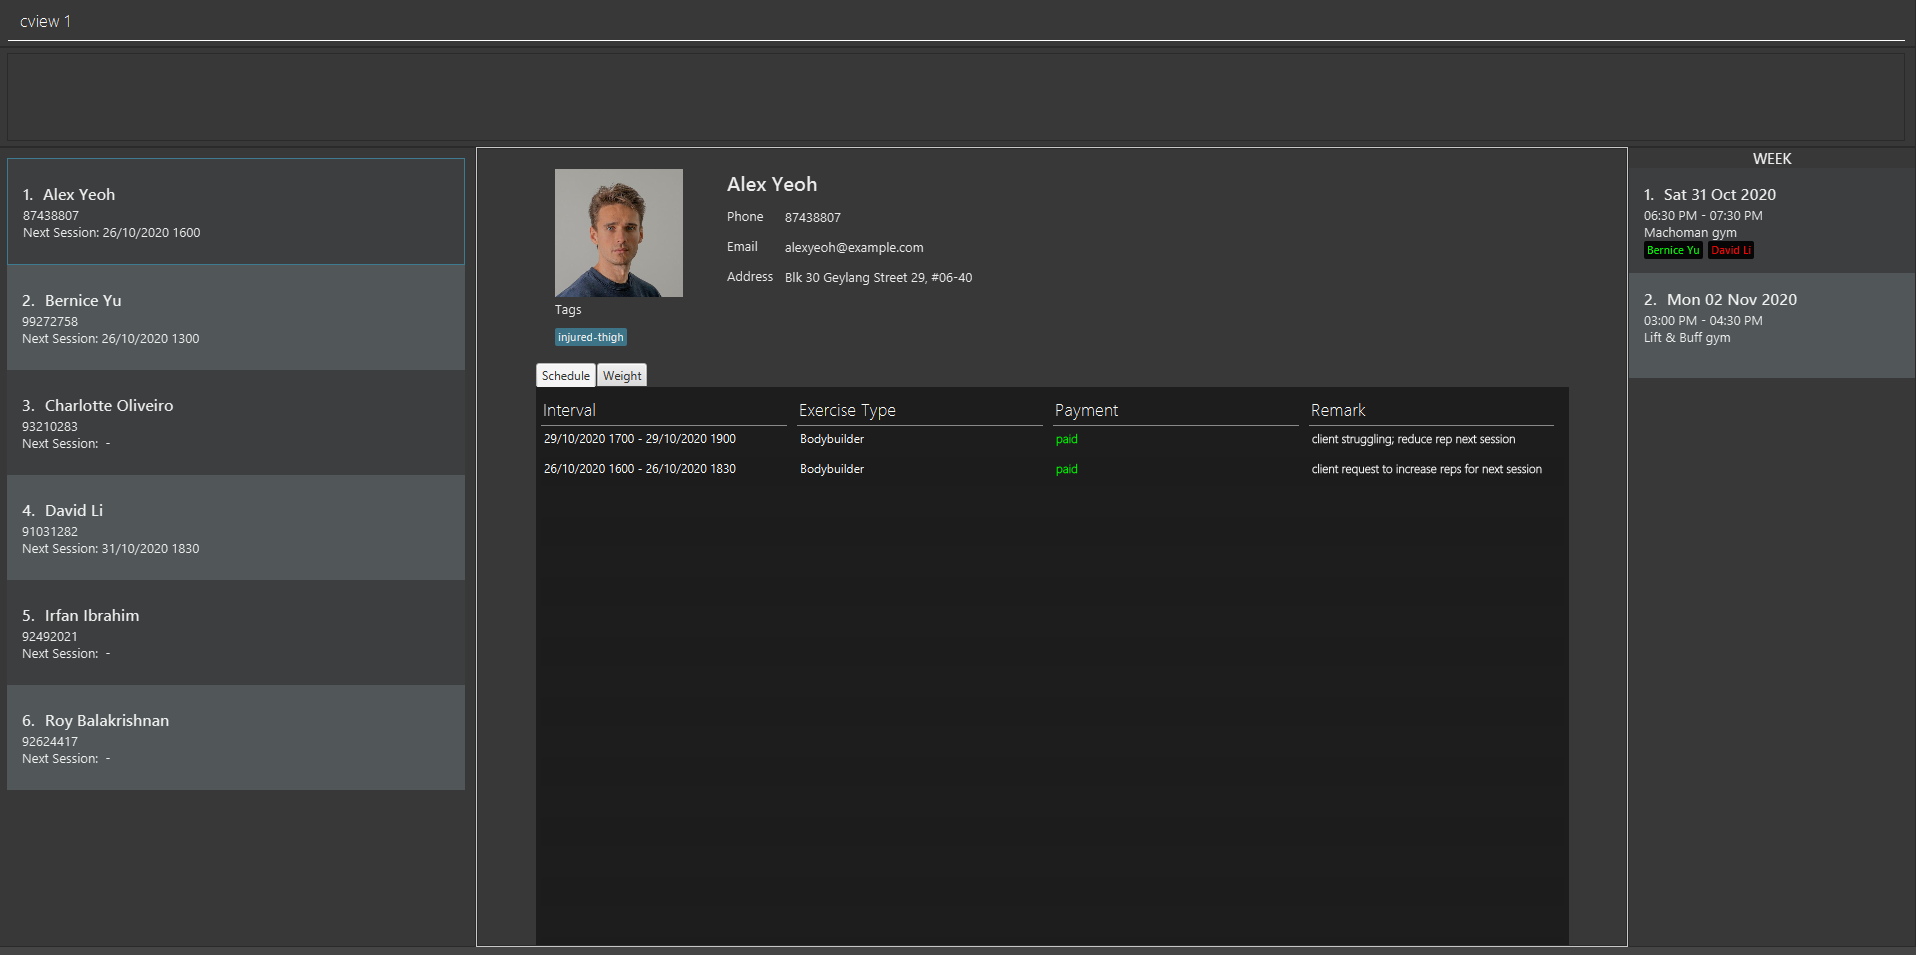
3.2.6 Viewing a Client : cview
You can view the full details of a client from the Client List.
You can easily look up the following information about the client in the Main Window:
- Your client’s name, email, address, phone, tags
- Your client’s weight history in line graph form
- A list of schedules associated with your client, together with the interval, exercise type, payment status, and remark
Format: cview INDEX
Points to take note when viewing clients from the Client List:
- Views the client at the specified
INDEX. The selected client will be displayed in the Main Window. - The index refers to the index number shown in the displayed Client List.
- The index must be a positive integer 1, 2, 3, …
- You can press “F3” key to view your client’s list of schedules, and “F4” key to view your client’s weight progression.
- You can sort the list of schedules in the client’s profile by the interval’s start time, payment status or exercise type.
Examples:
-
cview 2opens the second client in FitEgo -
cfind Bernicefollowed bycview 1opens the first client (Bernice) in the resulting Client List
The result of these commands is shown in the figure below
3.3 Session-related Keywords
We will describe all session-related keywords in this section. Before that, let’s define what we mean by session.
![]() Session:
Session:
A session represents a timeslot that is marked for a training session. It contains information about the gym, the main exercise type, the start time and the duration of sessions.
Each session can be scheduled with multiple clients, to model a trainer instructing a group fitness class.
Session-related commands will interact with the Session List which is located on the right of the UI. The figure below shows how it looks like.
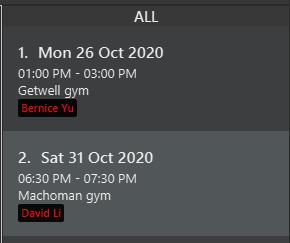
The ALL at the top of this Session List panel represents the current period of session view.
sview command.
3.3.1 Adding a Session : sadd
You can create a session with its relevant details. If the new session is within the viewing period of the Session List, the addition will be reflected in the Session List. This provides you with an easy reference to the periods in which you have session(s) scheduled and the location of each session.
Format: sadd g/GYM_NAME ex/EXERCISE_TYPE at/START_TIME t/DURATION
Points to take note when adding a session to the Session List:
- Start time should be of format “dd/MM/yyyy HHmm” (date/month/year Hour minutes in 24 hr format).
- Duration is in minutes.
- Duration should be a positive integer.
- If you want to schedule a session with a client, you need to make sure the session exists in FitEgo, then create a schedule (
schadd) that references the client and the session.
![]() Info:
Info:
FitEgo will not allow you to create overlapping sessions. We consider two sessions as overlapping if another session starts before the current session ends.
This helps to prevent you from accidentally agreeing to 2 sessions that overlaps with each other but are located on two different gyms.
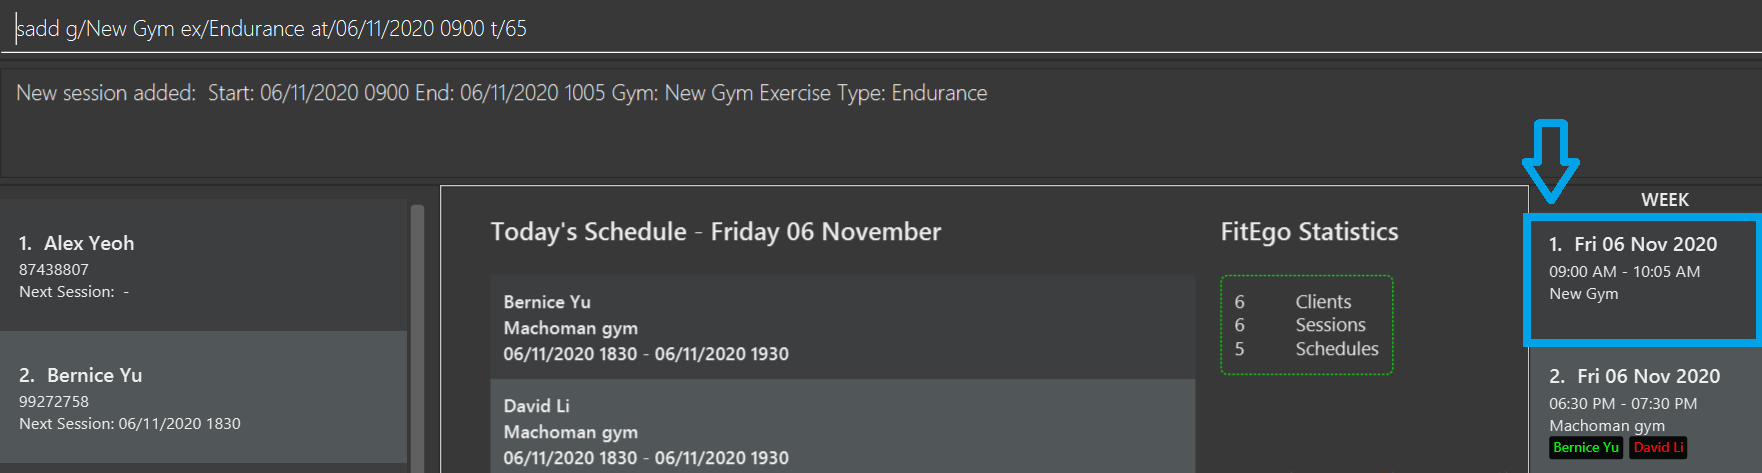
sadd g/New Gym ex/Endurance at/06/11/2020 0900 t/65Examples:
-
sadd g/New Gym ex/Endurance at/06/11/2020 0900 t/65adds a session at gymNew Gymwith exercise typeEnduranceat06/11/2020 0900hrsthat lasts for65minutes. The figure above shows the result of a successful execution of this command. You might need to set the viewing period to all (sview p/all) to see the new session show up in the right panel.
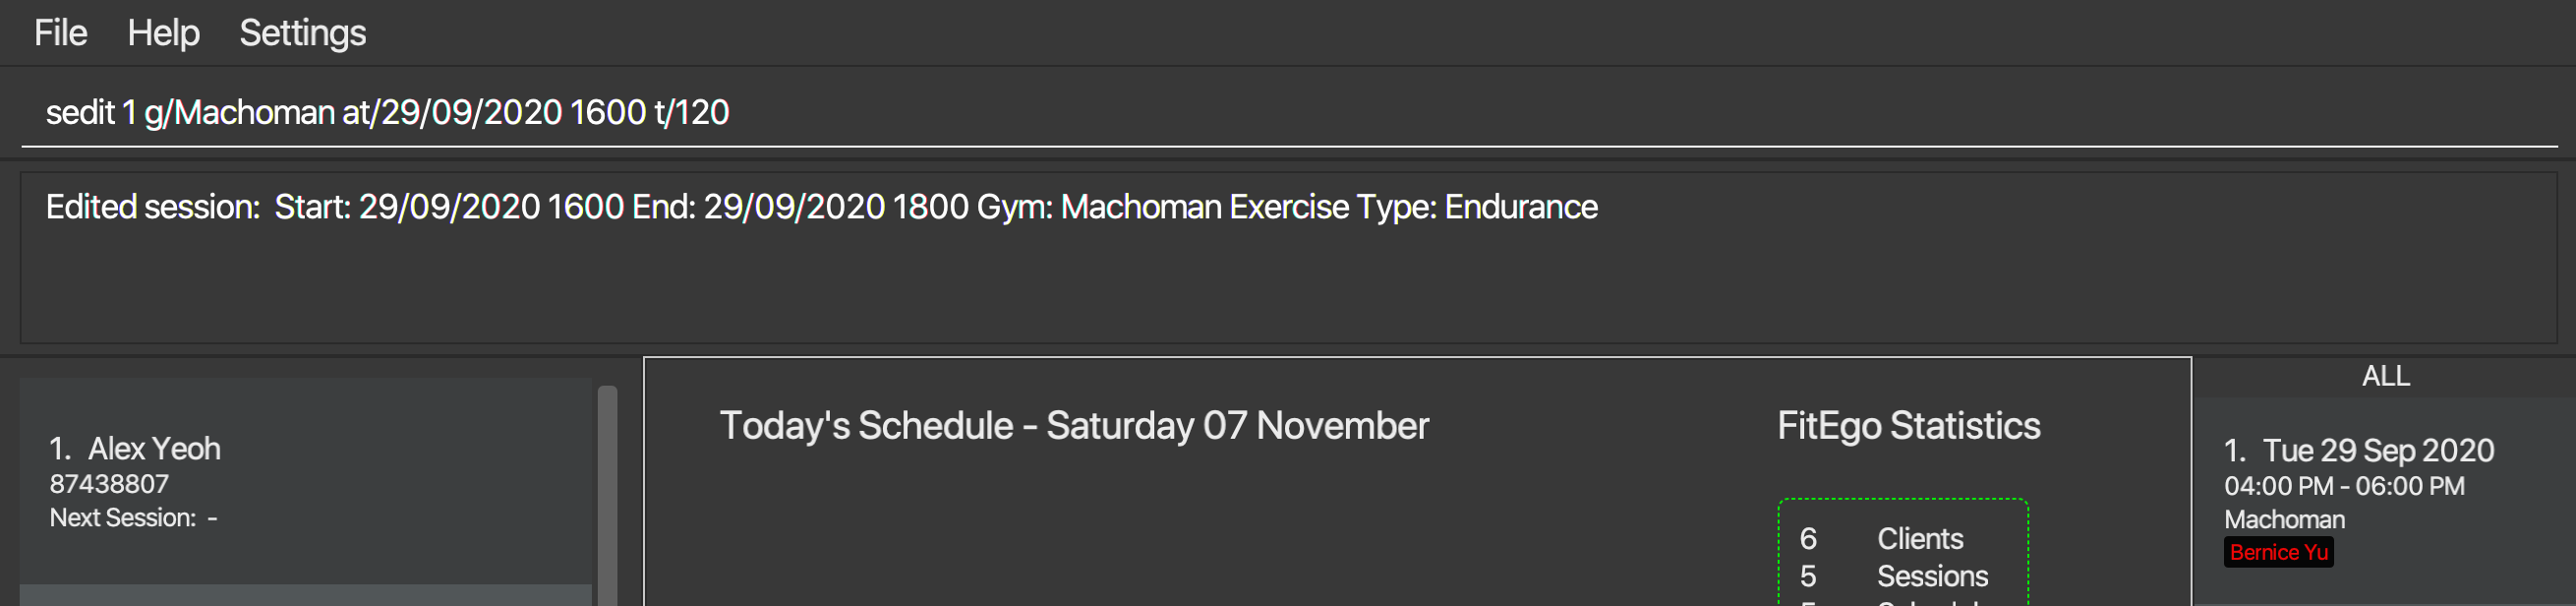
3.3.2 Editing a Session : sedit
You can edit the details of the session identified by the index number used in the displayed Session List. This ensures that you can always record the latest changes.
Format: sedit INDEX [g/GYM_NAME] [ex/EXERCISE_TYPE] [at/START_TIME t/DURATION]
Points to take note when editing a session’s details from the Session List:
- Edits the session at the specified
INDEX. The index refers to the index number shown in the displayed Session List. The index must be a positive integer 1, 2, 3, … -
GYM_NAMEandEXERCISE_TYPEcan be any words. -
START_TIMEandDURATIONconvention follows the commandsadd. - At least one of the optional fields must be provided.
- Existing values will be updated to the input values.
Examples:
-
sedit 1 g/Machoman at/29/09/2020 1600 t/120edits the gym of the first session to beMachomanand the start time and duration to be29/09/2020 1600 with a duration of 120 minuteswhile keeping all other fields the same -
sedit 2 at/29/09/2020 1600 t/120edits the start time and duration of the second session to be29/09/2020 1600 with a duration of 120 minuteswhile keeping all other fields the same
sedit 1 g/Machoman at/29/09/2020 1600 t/1203.3.3 Deleting a Session : sdel
You can delete the session specified by the index number used in the displayed Session List and all schedules associated with the specified session. This helps you keep track of only sessions that are still relevant to you.
Format: sdel INDEX [f/]
Points to take note when deleting a session from the Session List:
- Deletes the session at the specified
INDEX. - The index refers to the index number shown in the displayed Session List.
- The index must be a positive integer 1, 2, 3, …
Examples:
- If there are no schedules associated with the second session in the Session List,
sview p/allfollowed bysdel 2deletes the second session - If there are one or more associated schedules associated with the second session in the Session List,
sview p/allfollowed bysdel 2, you will see an error message
![]() Feature:
Feature:
To force deletion of session (and all associated schedules), pass in the optional force flag after the INDEX.
Any string after the force flag (f/) will be ignored.
- If there are one or more schedules associated with the second session,
listfollowed bysdel 2 f/will delete all schedules associated with the second session, then delete the session itself
3.3.4 Viewing Sessions within Period : sview
You can filter the Session List to view sessions within requested period. This helps you to prioritise your sessions as needed.
Format: sview p/PERIOD
Points to take note when viewing session from the Session List:
- Filters the Session List to display sessions within the specified period.
- On top of the Session List, you can find the type of the period you are viewing.
- The recognized periods are as follows:
| Period | Sessions displayed |
|---|---|
| all | All sessions (including past ones) |
| future | All sessions that have not started |
| past | All sessions that have already ended |
| week | All sessions within the next 7 days (inclusive of today) |
+[x][unit] |
Sessions within next x time units where x is a non-negative integer |
-[x][unit] |
Sessions within past x time units where x is a non-negative integer |
- The recognized units are as follows:
| Unit | Time unit parsed |
|---|---|
| d / D | day |
| w / W | week |
| m / M | month |
| y / Y | year |
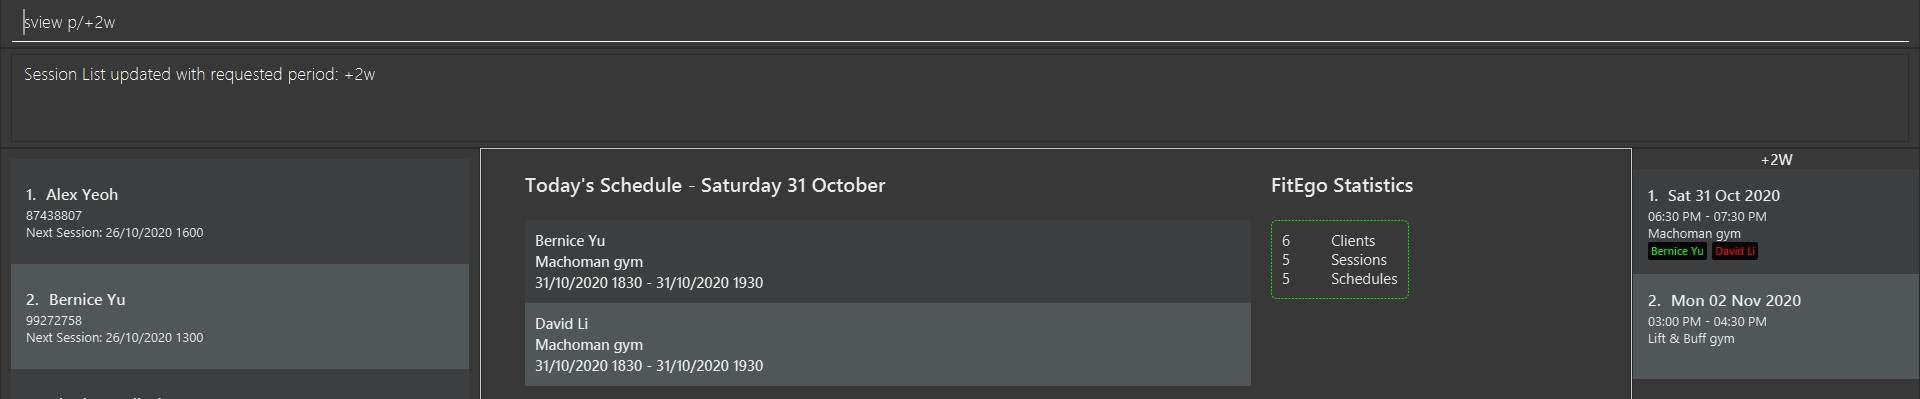
sview p/+2wExamples:
-
sview p/alldisplays all sessions stored in FitEgo -
sview p/+0Ddisplays all sessions today -
sview p/-1ddisplays all sessions from the past 1 day to today (yesterday and today) -
sview p/+2wdisplays all sessions from today to 2 weeks later. (e.g. If today is Friday, display from today to the Friday that falls 2 weeks later)
![]() Note:
Note:
The effect of sview is not updated in real-time but after FitEgo executes a command. For example, if you
- run
sview p/+0Dat 2359hrs on Friday - do not execute any command until 0000 hrs on Saturday
the Session List will still be showing Friday’s sessions at that point of time. To update, simply run any command successfully in FitEgo.
3.4 Schedule-related Keywords
In this section, we will describe all schedule-related keywords. Before that, let’s define what we mean by schedule.
![]() Schedule:
Schedule:
A schedule records the interaction between you and your client within a session. Each schedule contains information about the client and the attended session.
Listed below are three other types of information that you can add into a schedule:
- your client’s weight if you have recorded your client’s weight during a session
- exercises done by your client during the session as remark
- your client’s payment status on whether your client has or has not paid for the session
The table below shows an example of schedules. The session at Machoman Gym is attended by 2 clients. For each client, we can take note of their weight, activities, and payment status.
| Client | Session | Weight | Remark | Payment Status |
|---|---|---|---|---|
| John Doe | Endurance training at Machoman Gym (24/10/2020 1200 - 1400) | 70 kg | Planks (20 x 30 seconds), body weight squats (5 sets of 25 reps) | paid |
| Alex | Endurance training at Machoman Gym (24/10/2020 1200 - 1400) | 60 kg | Planks (10 x 30 seconds) | unpaid |
| Bernice | Body building training at Getwell Gym (27/10/2020 1300 - 1500) | 85 kg | Chinup (5 sets of 5 reps), muscle strain after bench press | paid |
To check if you have scheduled a session with a client, you can check if the session in the Session List contains the client’s name.
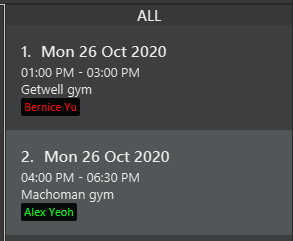
The figure above shows the Session List, in which for each session, there is a list of clients attending the session. Clients who have paid for a session will have their name shown in green, while those who have not will have their name shown in red.
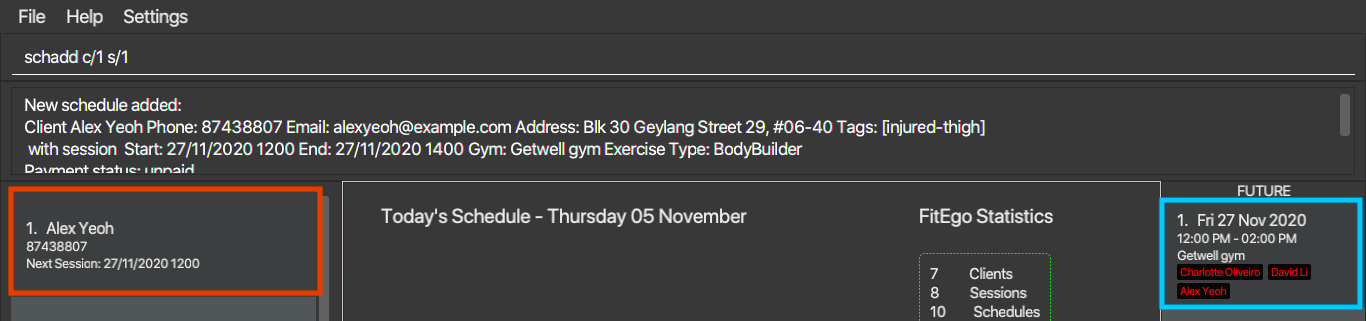
3.4.1 Adding a Schedule : schadd
You can schedule your client for a session. You can use this command to indicate that a client will attend one of your session.
Format: schadd c/CLIENT_INDEX s/SESSION_INDEX
Points to take note when adding a schedule:
- This will create a schedule associated with the specified client and session.
- The client is specified by
CLIENT_INDEX, and the session is specified bySESSION_INDEX. -
CLIENT_INDEXrefers to the index number shown in the Client List, and must be a positive integer 1, 2, 3, … -
SESSION_INDEXrefers to the index number shown in the Session List, and must be a positive integer 1, 2, 3, …
Example:
-
schadd c/1 s/1schedules the first client in the Client List with the first session in the Session List. As you can see in the figure below, Alex Yeoh (the first client, marked by the red square) is added to the first session in the list (marked by the blue square).
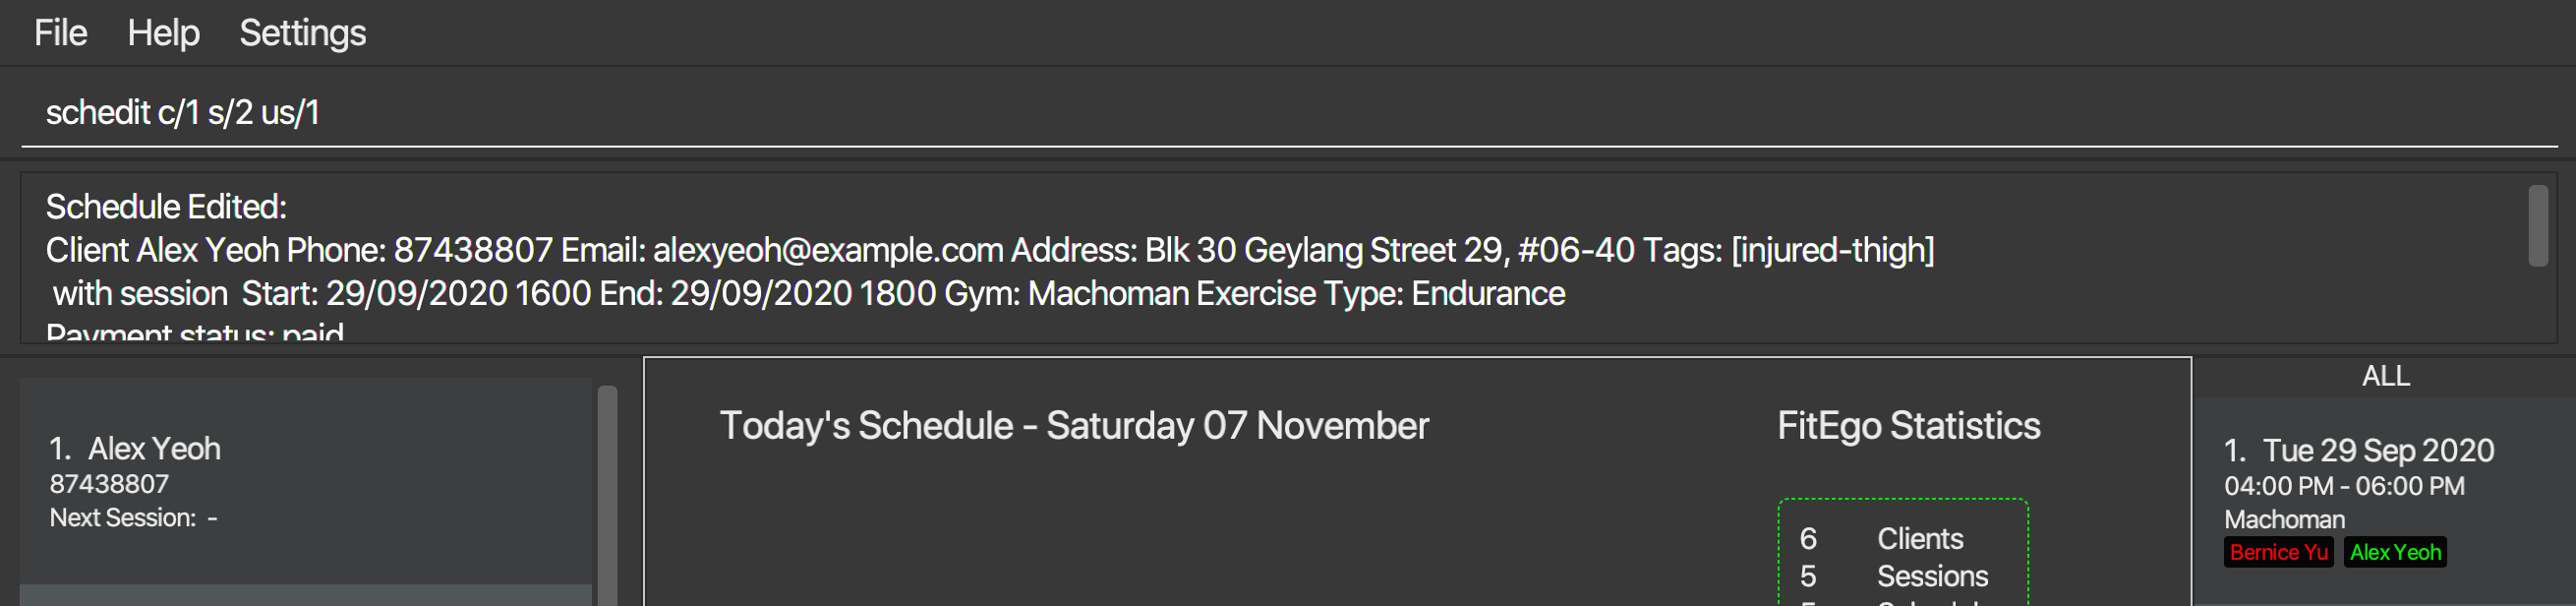
schadd c/1 s/13.4.2 Editing a Schedule : schedit
If you want to change your client’s session, payment status or remarks, you can edit the details of this schedule identified by the client index and session index.
Format: schedit c/CLIENT_INDEX s/SESSION_INDEX [us/UPDATED_SESSION_INDEX] [pd/PAYMENT_STATUS] [r/REMARK] [w/WEIGHT]
Points to take note when editing a schedule’s details:
- Edits the schedule that consists of the client and session indicated by
CLIENT_INDEXandSESSION_INDEX. -
CLIENT_INDEXrefers to the index number shown in the Client List. The index must be a positive integer 1, 2, 3, … -
SESSION_INDEXandUPDATED_SESSION_INDEXrefers to the index number shown in the Session List. The index must be a positive integer 1, 2, 3, … -
PAYMENT_STATUScan either bepaidorunpaid. -
REMARKcan be any words, phrases or sentences. -
WEIGHTmust be positive numbers and less than 1000kg. By default, units will be set to kilogram. You can also add eitherkgorlbto the back to specify the units. It will be displayed in 1 decimal place, but stored accurately. - At least one of the optional fields must be provided.
- Existing values will be updated to the input values.
Examples:
-
schedit c/1 s/1 us/2reschedules the first session in the Session List to the second session in the Session List while keeping all other fields the same -
schedit c/1 s/1 pd/paidindicates that the first client in the Client List has paid for the first session in the Session List while keeping all other fields the same -
schedit c/1 s/1 r/did 5 pushupsedits the schedule containing client index 1 and session index 1 to have remark of doing 5 pushups while keeping all other fields the same -
schedit c/1 s/1 w/70edits the schedule containing client index 1 and session index 1 to a weight of 70kg while keeping all other fields the same -
schedit c/1 s/1 r/clears the schedule containing client index 1 and session index 1 remarks while keeping all other fields the same
schedit c/1 s/2 us/1 3.4.3 Deleting a Schedule : schdel
You can delete a schedule associated with a client and session. You might want to use this command when a client decided to cancel attending a particular session.
Format: schdel c/CLIENT_INDEX s/SESSION_INDEX
Some points to take note when deleting a schedule:
- This will delete the schedule associated with the specified client and session.
- The client is identified by
CLIENT_INDEX, and the Session is identified bySCHEDULE_INDEX. -
CLIENT_INDEXrefers to the index number shown in the Client List. The index must be a positive integer 1, 2, 3, … -
SESSION_INDEXrefers to the index number shown in the Session List. The index must be a positive integer 1, 2, 3, …
Examples:
-
schdel c/1 s/1deletes the schedule associated with the first client in the Client List and first session in the Session List
4 FAQ
Q: How do I transfer my data to another Computer?
A: Install the app in the other computer and overwrite the empty data folder it creates with your previous FitEgo data folder.
Q: I have encountered difficulties with FitEgo. May I know who do I reach out to for assistance?
A: To get in touch with us, you may post an issue here, and we will get back to you as soon as possible.
Q: Am I able to mark multiple schedules as paid or unpaid with one command?
A: Currently, you are only able to mark only one schedule as paid or unpaid per command. This is a feature we are aiming to implement in the future.
Q: Is my data backed up to the internet?
A: No, your data in FitEgo are saved in the hard disk. You will have to transfer the data folder, to whichever device you wish to continue using FitEgo on.
5 Command Summary
You can find the comprehensive list of commands in the table below.
| Action | Format |
|---|---|
| Open Home Page | home |
| Open Help Window | help |
| Open Settings Window | settings |
| Clear all data | clear |
| Exit this program | exit |
| Action | Entity | Format |
|---|---|---|
| Add | Client | cadd n/NAME p/PHONE_NUMBER e/EMAIL a/ADDRESS [t/TAG] |
| Add | Session | sadd g/GYM_NAME ex/EXERCISE_TYPE at/START_TIME t/DURATION |
| Add | Schedule | schadd c/CLIENT_INDEX s/SESSION_INDEX |
| Edit | Client | cedit INDEX [n/NAME] [p/PHONE] [e/EMAIL] [a/ADDRESS] [t/TAG] |
| Edit | Session | sedit INDEX [g/GYM_NAME] [ex/EXERCISE_TYPE] [at/START_TIME t/DURATION] |
| Edit | Schedule | schedit c/CLIENT_INDEX s/SESSION_INDEX [us/UPDATED_SESSION_INDEX] [pd/PAYMENT_STATUS] [r/REMARK] [w/WEIGHT] |
| Delete | Client | cdel INDEX [f/] |
| Delete | Session | sdel INDEX [f/] |
| Delete | Schedule | schdel c/CLIENT_INDEX s/SESSION_INDEX |
| List | All Clients | clist |
| View | Client’s Full Profile | cview INDEX |
| View | Sessions within Period | sview p/PERIOD |
| Find | Client by Name | cfind KEYWORD [MORE_KEYWORDS] |
6 Acknowledgement
- This project uses libraries from ControlsFX